Now it's time to fix the color of those pixels on the edge of the object.
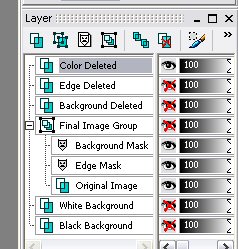
Duplicate the Deleted Edge layer and call it Color Deleted.
Hide the Final Image Group layer and make the Color Deleted layer visible and selected.
You are again duplicating a layer, as in Section 4, so that if you have problems you don't lose your previous work. You now have three different layers with work on them that you can come back to and make changes later if needed.
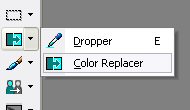
You want to fix the color of that blue edge, but you don't want to affect the color of the rest of the object. To do that, you create another mask. This mask is used to select only the pixels you want to make an adjustment to. All pixels removed are open in the mask for the color adjustment while the pixels that remain are protected. Once again, use the Color Replacer Tool to accomplish this.
Set your foreground color to white (or the color you set as your invisible color if different).
Zoom in and use your black and white backgrounds to help you spot all of the blue tinted pixels. The black background is especially useful for this.
Set your background color to a color of a pixel you want to get rid of by holding the control key down and clicking on the pixel.
Double click anywhere on your image. This applies the color replacement to your entire image.
If you lose too much of your object, undo the change and try going down in tolerance or selecting a slightly different color pixel.
Repeat until you're satisfied that all pixels that need color adjustment are no longer visible.
Again, watch out for holes in the trunk or interior of your object and patch or undo them as shown in Section 4.
When finished with this you turn the layer into a mask as you did in Section 2 but this time you invert it so that the non-visible pixels are the ones that are selected.
Make only the Color Deleted layer visible.
Right click on the Original Image layer and select New Mask Layer > From Image.
Select the current file you are working on under source window.
Select Source Opacity under Create Mask From.
Check Invert Mask this time and click OK. Checking it creates the mask based on the inverse of the visible layer.
Name the new mask Color Mask.
Again the new grouping is not needed so right click on the new group and select ungroup.
Hide the Color Deleted layer and make the Final Image Group layer visible again.
Only the pixels you want affected by the color change are now visible. Next make a selection based off the mask and create an adjustment layer.
With the mask layer selected go to Selections > From Mask.
Right click on the Original Image layer and select New Adjustment Layer > Curves. If you prefer, you may use levels instead.
Click on the general tab and rename the adjustment layer Color Mask Adjustment. Click OK.
Once you've made the adjustment layer hide the Color Mask layer. You do not want it to mask out the entire object.
Deselect the image by going to Selections > Select None. This makes it is easier to see the changes being made by the adjustment layer.
Double click on the Color Mask Adjustment layer.
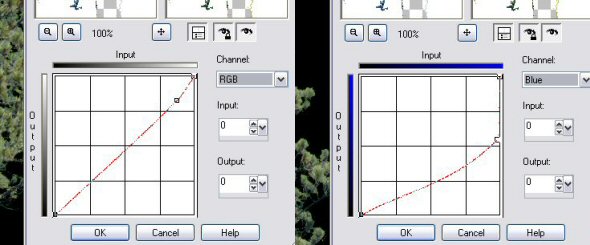
Select from the different channels and make adjustments until the object looks good on both the black and white backgrounds. You'll need to click OK to change the background and zoom in or out. Just double click on the adjustment layer to continue making changes.
The blue sky blended with trees adjustment typically involves lowering the Blue and RGB channels and tweaking the green channel a little either way.
I did not see a need to change the green channel for this image. Here is what I used for the RGB and Blue channels:
If you have more then one different color to fix then repeat this process, creating separate adjustment layers for each adjustment.
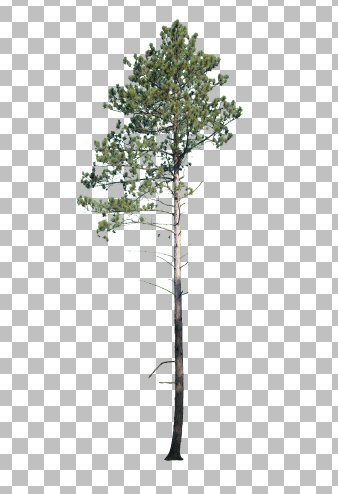
When you are finished it looks something like this:
Now save a final version in PSP format so you can come back to the file with all the layers if needed. All of the layers are lost when saving for PGA 2000, so do not save another PSP version in the next section.
