Unfortunately both Google Earth and Microsoft Virtual Earth do not provide a way to save imagery at high resolution. This makes them more difficult to work with then the USGS.
One solution is to use the Print Screen key. Doing this you'll either need to fit the entire plot on screen and have a low resolution image or stitch a bunch of screenshots together in a paint program.
Instead, to save some work and still have a high resolution image, use an oversized Google or Microsoft Map in a webpage. Then use a browser plug-in to take a screenshot of the entire webpage.
First you need to download and install the plug-in for your web browser:
Right click on the desired webpage file, select "Open With" and choose Notepad. If Notepad is not on the list then select "Choose Program", select Notepad, and click OK.
You'll see the HTML code for the page.
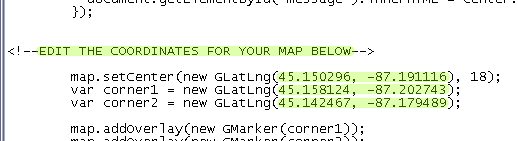
Find the section that says "Edit the Coordinates for your Map Below".
On the first line below change the coordinates to the latitude and longitude coordinates for the approximate center point of your plot. On the second and third lines change the coordinates to the latitude and longitude for northwest corner and southeast corner. See the Location Coordinates Section if you do not know the coordinates.
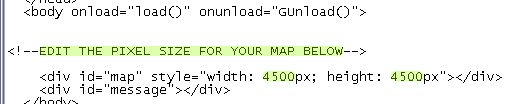
Find the section that says "Edit the Pixel Size for your Map Below". This is where you set the map size. You can leave this unchanged for now but you may have to go back and adjust it if your image doesn't fit in the window.
Save changes, close notepad, and open the file in your web browser.
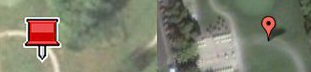
Use the browser scroll bars to move around the map and look for the markers.
These mark the northwest and south east corners of the plot. If you do not see them –
Close the browser and open the file in notepad again.
Find the section that says "Edit the Pixel Size for your Map Below".
Increase the number for width and height.
Use the zoom control to zoom to the largest level where you still get and image. If zooming in, again check that you can still see the markers and if not adjust the map's size as in step 5.
The image takes awhile to load even on a high speed connection. Once it is fully loaded and you have both markers in view, use the browser plug-in to save a screenshot of the entire map.
In IE go to Tools > iWebshot.
In Firefox right click anywhere in the window and go to Screengrab > Save > Complete Page/Frame.
The plug-in opens and allows you to save the screenshot.
Finally open the saved screen shot in a paint program and crop it so the corners of the image are at the points the markers point to. Now your image matches the coordinates of your plot exactly.
Save it. To keep the file size down you may want to save it as a JPEG and delete the original image.